Friday, May 8, 2020

Project #24 - Los Cascarones

Cascarones are confetti-filled eggs that are mostly thought of as a part of Carnival celebrations, though are increasingly a part of other special occasions such as Easter, New Year's and birthdays. I was thinking that they could be an easy and fun gift to give for Mother's Day. Find out more about the inspiration and history of cascarones underneath the directions for making them.

Materials - Eggs, paper to cut into confetti, scissors, perfume (to fragrance the confetti), permanent markers, water & glue mixture, paintbrush, art tissue, small soft plant material.
Making
1.  Gently tap one end of the egg to create a small crack, then break away a small hole (try for less than 1" in diameter).
2.  Gently remove the egg whites and yolk.
3.  Wash the egg, then set it aside to dry. 
4.  Find some colorful paper and spray it with a favorite perfume.
5.  Cut the paper into thin strips and then into small pieces.
6.  Decorate the outside of the eggs. I tried 3 different ways, though of course there are many other ways:
*  Use permanent markers to print a message and add designs.  Watercolor markers can be used to add areas of color, but they will smudge easily.
*  Cut small shapes out of art tissue. Then use a paintbrush to coat watered down glue under and over the tissue paper shapes. 
*  Use the same watered down glue approach to decorate an egg with small soft plant material.
7.  After the eggs have dried, inside and outside, pinch bits of confetti inside each egg. It's best if you fill each egg at least 1/2-full.
8.  Glue art tissue over the hole to close it.
9.  Give the cascarones as a gift.
10. With permission, you or the person who received the cascarones gift can tap it gently while making a wish, the crush the egg over someone's head to sprinkle the perfumed confetti all over them.
Inspiration - I first learned about cascarones in a book titled, Family Pictures /Cuadros de Familia by artist and author, Carmen Lomas Garza. In this book, and many others, she illustrates the everyday traditions of her Mexican-American family growing up in South Texas.

An example of how cultural traditions travel the world, it turns out that cascarones first appeared in China centuries ago. It is thought that the explorer, Marco Polo, brought them back to Italy, then Spain. The custom made it's way to Mexico, and has since become known in the Southwest of the U.S. Cascarones were originally filled with powdered perfume, though now in Mexico and the U.S. they are usually filled with confetti.  Cascarones are most commonly a part of Carnival celebrations in Mexico, but are increasingly a part of Easter and other annual festivities.


Cascarones (Easter eggs)

1989, Carmen Lomas Garza


Wednesday, May 6, 2020

Project #23 - Mythical Creatures Inspired by Curiot

Materials - Paper, pencil, watercolor paints/other paints or markers/colored pencils

Making 
1. Find a great place to sit and make art.
2. Find a piece of paper and gather your supplies. 
3. Think of a mythical creature that you would like to create - you can combine human and animal characteristics.
4. Does your creature have a story? Keep that in mind as you make…
5. Sketch out your creature. Include shapes and patterns!
6. You can outline in marker if you want.
7. Use bright color to fill in your creature.
8. Write out your creature’s story. 
My creature is an explorer at the bottom of the ocean. He came across a city that looks much like Milwaukee! 

Inspiration 
Curiot (Favio Martinez) is a Mexico-city based painter and street artist that creates vibrant mythical creatures that are part animal and part human. Much of his work can be found in large murals on the street. His creatures are inspired by Mexican folklore and traditions, including tribal art, Day of the Dead, and geometric designs. In his work, look for geometric patterns and lively colors. Take a look at some of his work below to get inspired to create your own mythical creature that tells a story of your own! You can research traditions and gather inspiration, or, you can create a story. Think about: How can you combine human elements/animals? How can you use bright colors, shapes, and patterns?


Wednesday, April 29, 2020

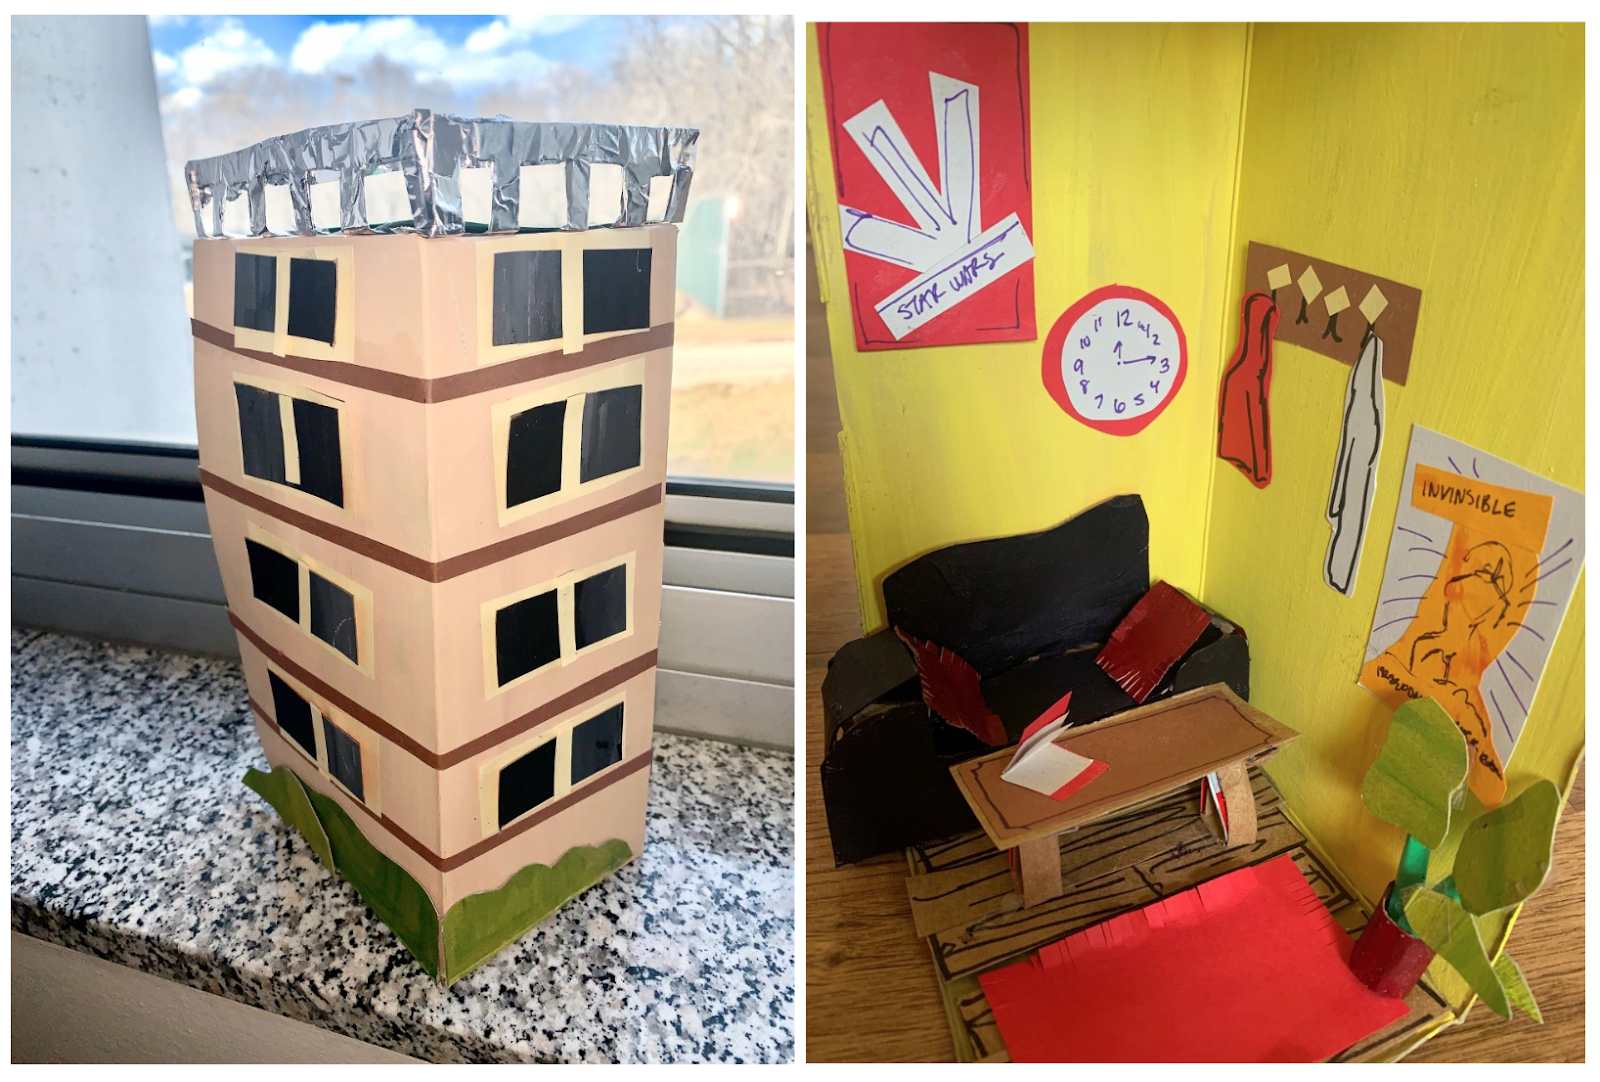
Project #22 - Cardboard Places

Thank you Ms Bri (our Fratney student art teacher), for your second Wednesday project post! I think it is a super thoughtful idea to make art that imagines our inside and outside spaces during this time in which we are all practicing social distancing.


Materials - Cardboard (delivery box, tissue box, shoe box, or pieces of cardboard), paint/paper, scissors, glue/tape, markers/crayons/pens/pencils. Other materials you may want to add. 


Making -

1. Find a box. You can cut away part of it if you want to show the inside. 

2.  Pick a place you want to show. Maybe where you live, a specific room, somewhere you like to spend time, or some place you like to go in your community.

3. Paint the box or glue on construction paper for a base. 

4.  Use paint, paper, markers, and other pieces of cardboard to create the inside and outside of your place. Think about details of the place you choose. 

Make some details out of cardboard and paper for your place. 
4. Glue or tape on details on the inside and outside of the place. Add more details with markers if you want!

NOTE - If you do not have a box, use a flat piece of paper to make a relief (when pieces of a sculpture are attached to a background. See below for examples!)

Inspiration - 
Ana Serrano is a first-generation Mexican American artist who is inspired by her dual cultural identities. In much of her work, she uses bright colors of cardboard and paper to create buildings inspired by Latino neighborhoods across the US and in her hometown of Los Angeles. She looks at details of places and how people decorate their homes and businesses. Take a look at some examples of her work, and check out her website for even more examples!
If you don’t have a cardboard box, check out these examples that use layering: 


Tuesday, April 28, 2020

Art Links

Send your favorite online art links to me (Ms. Sue) at pezanosm@milwaukee.k12.wi.us or place in the comments section below, and we can post them here to share with the rest of our La Escuela Fratney friends.
  • Lynden Sculpture Garden's Virtual Hub - A new online resource with virtual tours and resources for families and teachers. When you visit the site, you can subscribe to a list to receive notice as new content is added. https://lynden.tours

Monday, April 27, 2020

Project #21 - Still Life in 4 Styles


Materials - Still life objects, paper, pen or pencil, any variety of materials that you have available to add color, such as markers, crayons, oil pastels, chalk, watercolor, acrylic paints, etc.

Making
1.  Set up a still life on your table.
2.  Fold your paper in 1/2 in both directions to create 4 separate boxes on your paper.
3.  Number the boxes. Assign a separate style for each one. 
4.  Make a sketch in each box, using a different style for each. 
  • For me, box #1 is "impressionism", a loose style made with dabs of blended colors. Line is not important, so the sketch in this box is simple and light. 
  • Box #2 is "cubism", a style characterized by a space that is fragmented, so I started by drawing lines that make the space look like a broken window. Then I sketched the still life. Every time i drew up to a line, I continued drawing, but picked a different spot to continue, so that each object appears broken or fragmented.
  • Box #3 is "pop art", a cartoon like style where lines shapes and colors are very bold and simplified.
  • Box #4 is "fauvism", a more colorful and rough style that often has bold dark outlines.
You can try these same styles, make up your own, or research to find other styles to try.


Inspiration - I chose four artists from the history of art, who are very well known for their groundbreaking use of a specific approach to painting. Here are some typical examples of their art:

Impressionist Style - Henri Matisse, "Still Life with Pitcher"                  Cubist Style - Georges Braque

Fauvist Style - Gabriele Munter
Pop Art Style - Roy Lichtenstein


Saturday, April 25, 2020

Project #20 - Photo Collage

Materials - Old magazines, scissors, glue

Making
1.  Look through the pages of several old magazines looking for images that you like. Think about finding an interesting setting/background, characters, and details that will add to the story.  
2.  Cut or tear out the pages containing the images that you like.
3.  Carefully cut along the edges of each of your shapes. Don't rush the cutting, because carefully cut images will make an okay collage into a great one.
4.  Take some time to play with composing the space, arranging objects and characters until your collage feels the most exciting and interesting to you.
5.  Glue your collage pieces together.


Inspiration - Romare Bearden is an important American artist for many reasons, including his use of collage to depict aspects of black culture.  Romare grew up in Harlem during the Harlem Renaissance and his art is often compared to jazz music. His artwork communicates powerful themes of social justice and community.
Romare Bearden, The Train

Thursday, April 23, 2020

Project #19 - Macrame & Friendship Bracelets

When making friendship bracelets, we are using a fiber arts technique known as "macrame".  Macrame is an organized system of making knots to create anything from bracelets to scarves, or even creations beyond your wildest imagination, as you'll see from the artist inspiration at the bottom of this post. 
Materials - Yarn (or string, embroidery floss, hemp cord), scissors, tape

Making - The easiest way to learn how to make friendship bracelets, or the craft of macrame, is to watch someone and then try it yourself, so enjoy the different approaches demonstrated in each of the videos here. 


Inspiration - Examples of macrame are seen in many different cultures around the world and date back to ancient times. It is believed that the word macrame comes from the Arabic word "miqramah" which translates into "striped towel" or "embroidered veil".  Others suggest it comes from the Turkish word "makrama", meaning "napkin" or "towel". These words all appear to be cognates, words that are similar across different languages.

In recent years, there has been a resurgence of the use of traditional crafts amongst contemporary artists. Ernesto Neto is a Brazilian artist who uses macrame and crochet to creates large scale works of art. Much of his art works are large interactive environments that people can enter into.

Wednesday, April 22, 2020

Project #18 - Sharing Your Essential Knowledge

Happy Earth Day Fratney students & friends!
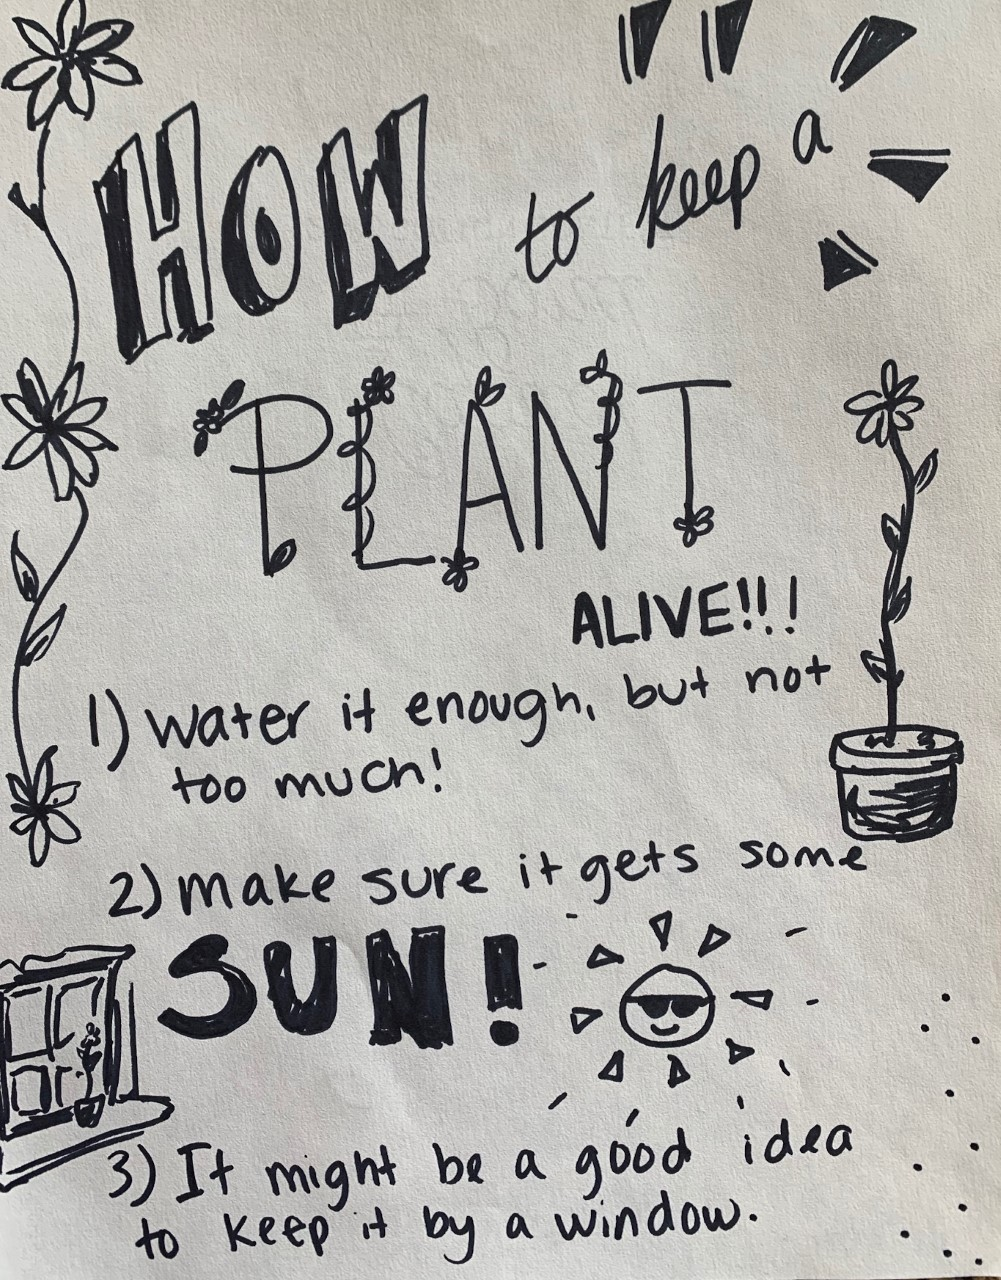
Bri Sayeg, Fratney student art teacher, is posting her first project to our blog today. "Sharing Your Essential Knowledge", is a fun way to use drawing and writing to teach other people about something you are interested in &/or know a lot about. This approach to making art is the inspiration of Milwaukee-based artist Colin Matthes. You can learn more about Colin at the end of Bri's post. Enjoy!


Hi Fratney students! Click on this link to see "How to keep a plant alive!!!"
Materials - Paper and marker (or paint, pen, pencil, crayon)


Making -
1. Sit in a place where you feel calm and comfortable. 
2. Look at some of the examples from the artist, Colin Matthes, to help come up with some ideas of your own “essential knowledge.”
3. Think of something you are good at. If you are stuck, read the list below for some ideas. 
4. Draw your knowledge. Include these three elements in your design: title, directions, and images. 
5. Add some contrast - light and dark colors/shapes. 
6. If you want to do another, pick a new idea!


Ideas-
  • How to make a food (something you like to make!)
  • How to play a game 
  • How to do a dance 
  • How to draw/paint something
  • How to do a sport
  • How to decorate/celebrate for a holiday
  • How to go camping/do something outside 
  • How to do something with someone 
  • How to be great at…
  • How to do a daily task 
Inspiration 
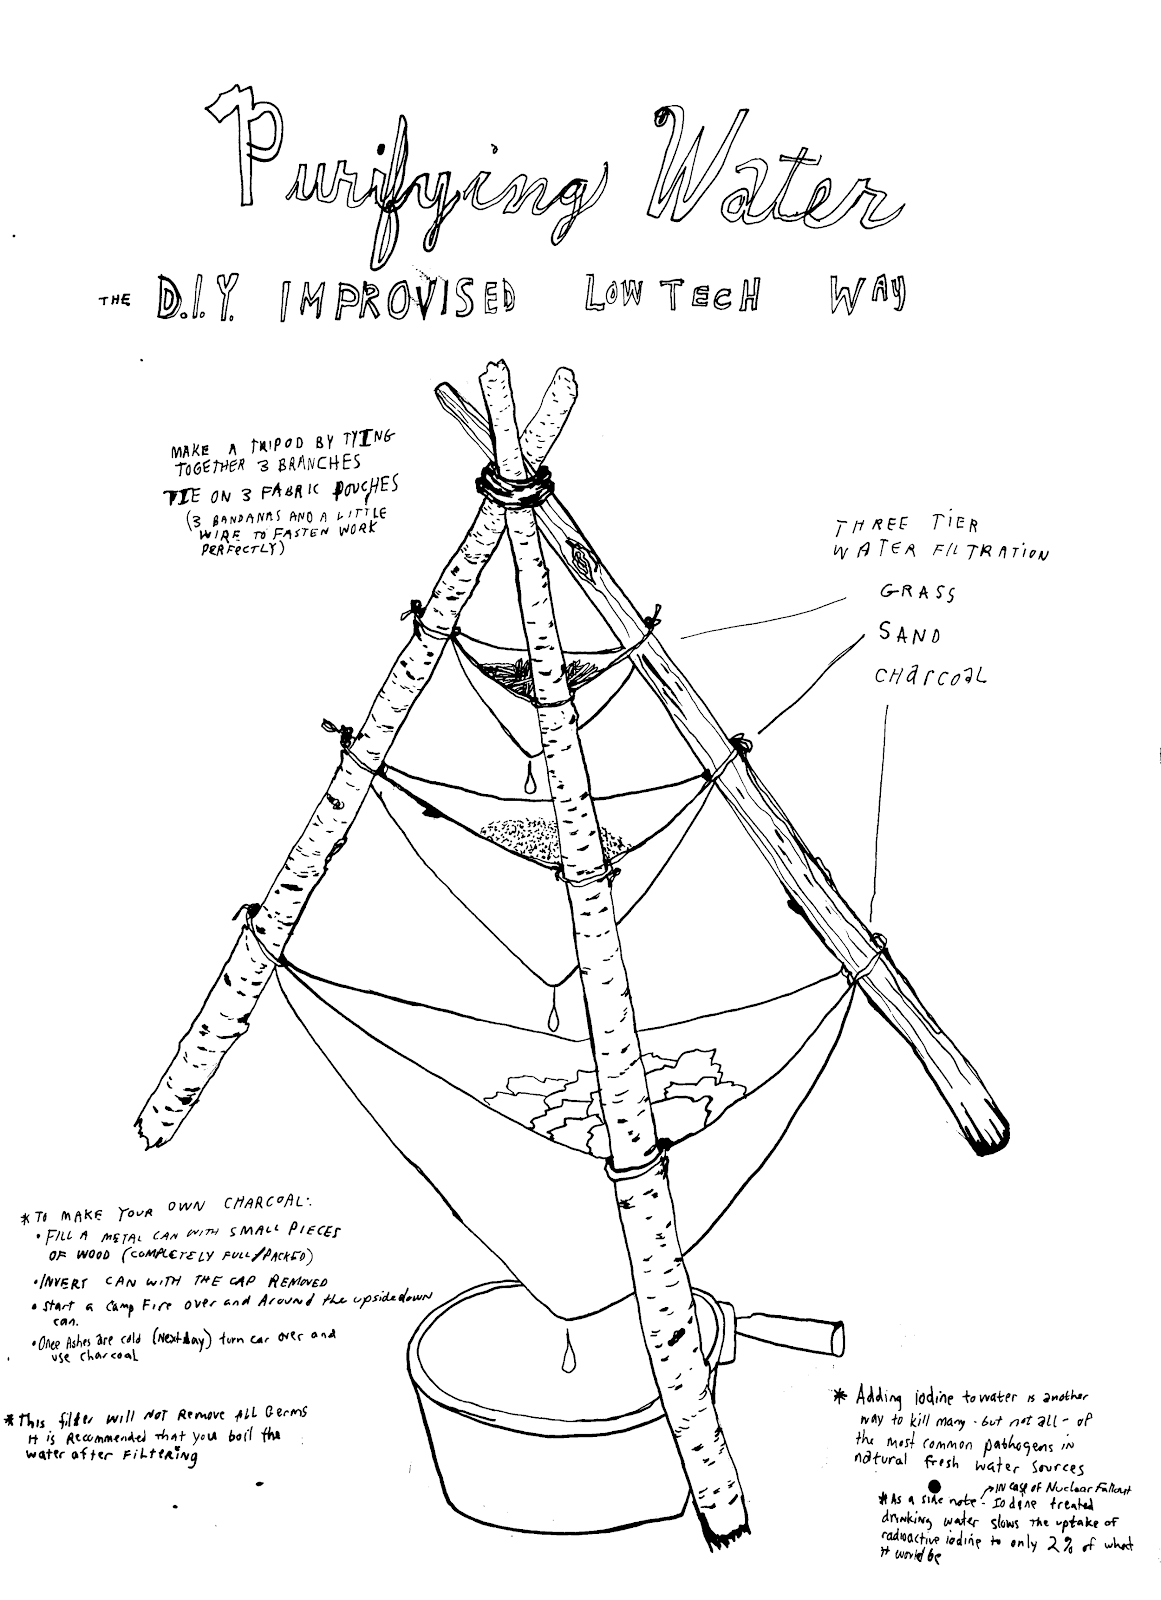
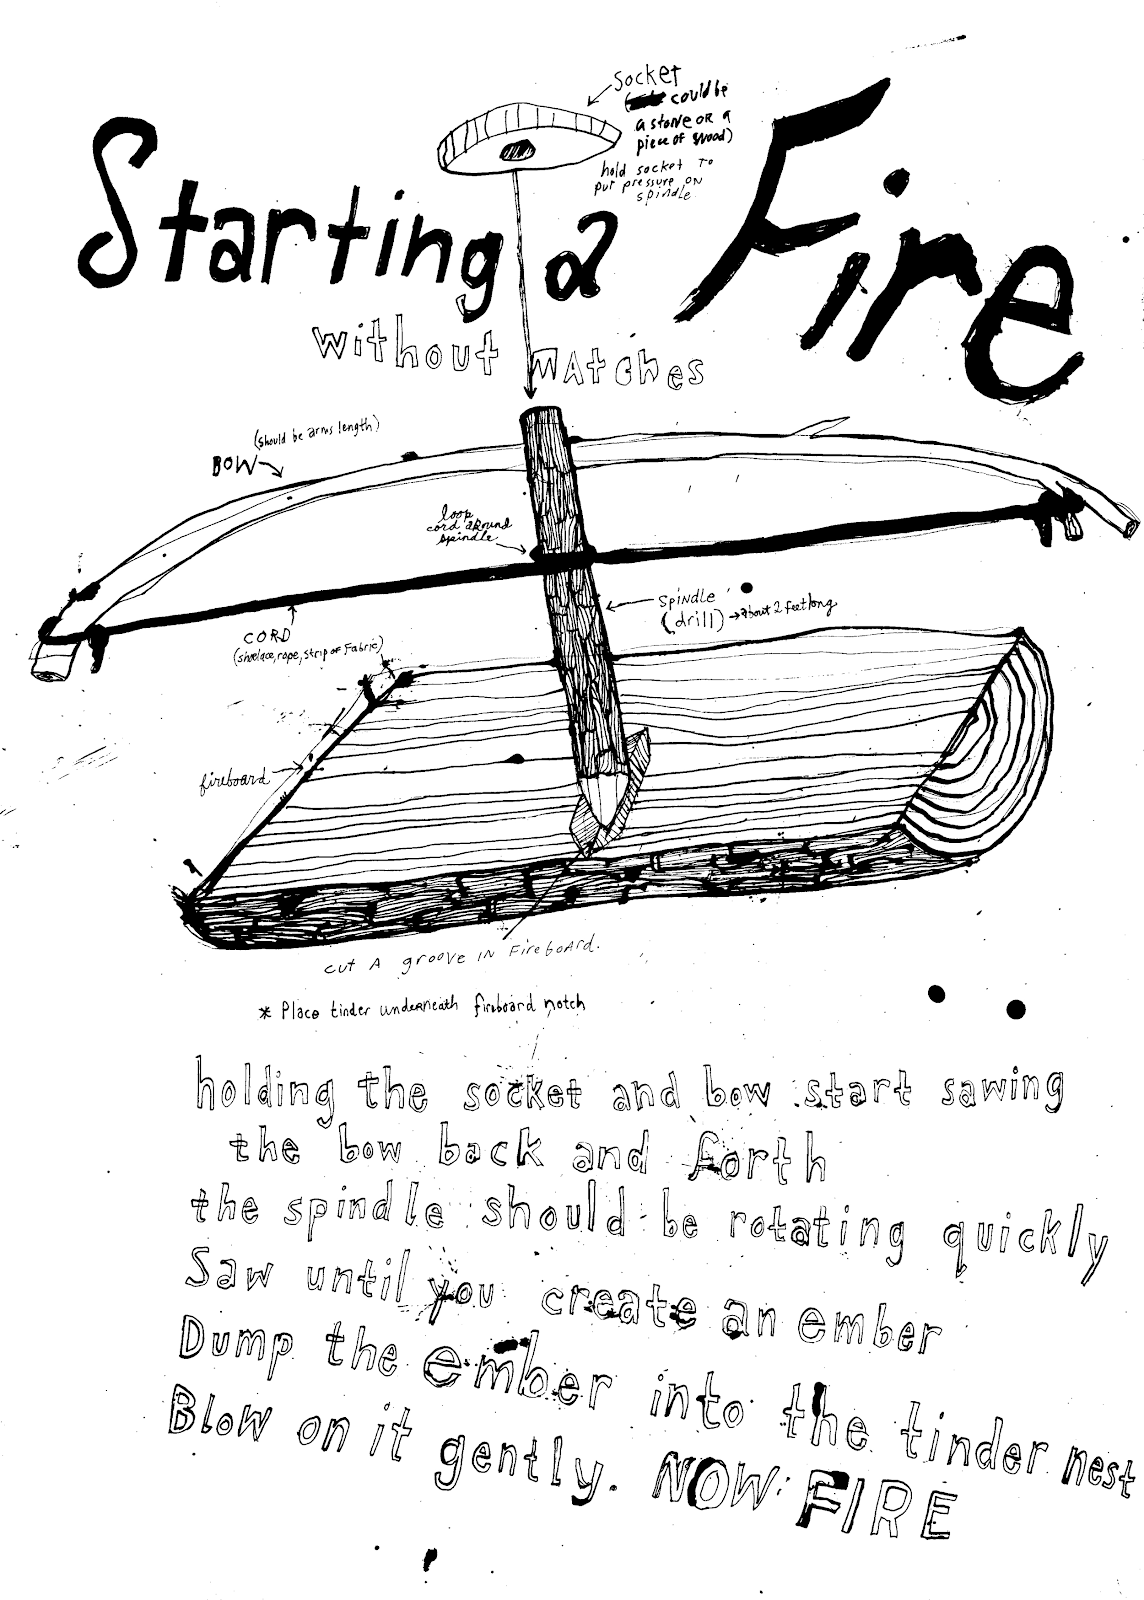
Colin Matthes is an artist from Milwaukee. He works on collaborative projects with Justseeds Artists’ Cooperative and does individual projects as well. For one of his projects, Essential Knowledge, he creates drawings teaching skills for success in challenging situations and tells stories. Here are some examples of his work. As you look over them, think, what is something that you know how to do well? 


Total Essential Knowledge is another project that is ongoing that he works on. He facilitates events that allow participants to find something unique they do, know or think and create an instructional drawing to share their information. He was an artist in residence at La Escuela Fratney in 2018. During his time at Fratney, he had students share their curiosity, experiences, and interests through narratives using drawing and text in dip pens, brushes, and ink. Check out this link for some examples of the project:


Images from Colin Matthes’ Essential Knowledge:


Tuesday, April 21, 2020

Tomorrow, April 22, is EARTH DAY!

Tomorrow is the 50th anniversary of Earth Day.  Wow.  As the whole world is impacted by the Covid-19 pandemic, we are pulling together, sometimes slowing down, and learning new ways to care for each other and the earth.  This year, there will be no large public gatherings, so our celebrating will be quieter. Tomorrow is Earth Day. Take a deep breath, close your eyes, smile to yourself, and choose one special thing that you can do to say "thank you" to our Mother Earth.  Here are some special "thank you" art works made by students today.


Clockwise from top left: Cece, Victoria, Sophie and Audrey

Monday, April 20, 2020

Project #17 - Colors, Shapes and Stories in 3-D

This Wednesday, April 22nd, is Earth Day. Let's celebrate this important day with another project using recycled materials. I should tell you that I got this idea from my nephew, Jackson, who lives in Oakland, California. The artist who inspired this project is Frank Stella. You can read more about him at the end of this post.

Materials - Recycled materials (we used cardboard, but you could also use plastic, foil, styrofoam or other scrap materials), scissors, paint (if you don't have any paint, you could also use markers, crayons, or even scraps of colored paper)

Making
1.  Cut your scrap material into a variety of sizes and shapes that can be both geometric or organic (see vocabulary below). 
2.  Connect pieces together by cutting notches into each piece and then sliding them together.
3.  To make your art a free standing sculpture, you will have to choose two or more pieces that, when put together, will be free standing.
4.  Continue to add other shapes by cutting notches and sliding them together.
5.  When you have finished designing your composition of shapes, you can paint them just as they are, OR, you can slide the pieces apart to paint each one separately. 
6.  When the paint on both sides of your shapes is dry, you can slide the sculpture back together.
7.  I like the look of the scrap of cardboard that I used to paint on, so I am using part of it as a base.


My nephew Jackson's sculpture
Vocabulary
3-d (3-dimensional)- an object that is not flat and has more than 2 dimensions in space, so it not only has height and width, but also depth.

Geometric shape- a shape that is uniform according to mathematical descriptions, such as circles, triangles, squares and so on.

Organic shape-  is less predictable or uniform, like the shapes of things you find in nature, such as clouds, leaves or puddles of water.

Inspiration - Frank Stella is an American artist best known for his use of shape, color and pattern. His earlier works were traditional rectangular paintings of geometric forms and lines. Over time, he experimented with changing the normal shape of his paintings, instead using organic shapes with more and more texture. Eventually, he broke the painting surface into a combination of separate shapes connected at different angles in space. By doing this, his painting became sculptures. Frank Stella said that he composed shapes and colors to tell an abstract story.
Frank Stella, Exotic Bird Series, 1978-1979


Friday, April 17, 2020

Project #16 - Abstract Expressionist Painting

Today I was with some students (virtually) for a Friday "open studio" or hangout time,  I noticed one student, in particular, was experimenting with mud painting (Project #11). Her playful approach to painting reminded me of a style of art known as abstract expressionism (see vocabulary below).  Later, I was inspired to dive a little deeper into this approach to painting, which for me is about experimentation, play and meditation.


Materials - Cardboard scraps, collage items (collected from nature or recycled materials), glue, paint, paintbrushes, palette for mixing paint (I used a plastic lid), container of water

Making
1.  Glue materials to your cardboard to create texture.  It's okay to do this with your own style, which could be more abstract and random or more controlled and patterned. My first attempts were more organized like a landscape. I am slowly learning to work more abstractly.
2. Using any kind of paint that you have, choose three colors that you like, plus black and white. Put some of each color onto your palette.
3.  Use your imagination! The trick to beginning is to NOT overthink or expect perfection. The whole idea is to play.
4.  Pick a color and a spot on your cardboard and begin. Keep your brush moving and mix your colors as you go. 
5.  Add water to experiment with the consistency of your paint.  
6.  If you like something, do more of it. If you don't like something, cover it with a new color.
7.  Experiment with how you hold and move your brush, for example, quick dabs or long twisting lines. 
8.  Stop when you feel the space is layered and filled up enough.
9.  Step back and take a look from the other side of the room. That will help you to see your painting with fresher eyes. 
10. Maybe a new color of detail will pop into your mind. That's called intuition. Follow it.

Often an artist lets a painting sit for days, looking at it to see if new ideas for how to finish appear.  It might feel like a struggle to experiment with painting, but it also should feel purposeful and fun. You won't always be in the mood to experiment like this, but when you are, it can really cheer up your day!

Vocabulary
Abstract expressionism- is a style of art first attributed to American painters in the 1940's and 1950's. Abstract means that the art does not look exactly like something we would see in everyday life. Expressionism describes art that communicates emotion and energy.  Working in this style, an artist might feel focused, yet also spontaneous. Looking at abstract expressionist art, you might feel your imagination and emotions activated.

Collage - comes from the French verb, coller, which means to glue or attach different materials together.


Inspiration - Recently, more attention has been given to women artists who painted in an abstract expressionist style. One of my favorites is Perle Fine.  Perle grew up on a dairy farm with six brothers and sisters. She was the only one in her family who became very interested in art while she was still in elementary school. She continued to study art after she graduated from high school. Perle liked to collage different materials into her paintings, and work on different surfaces, like wood and metal.  Some have said that her artwork reminds us of our interconnectedness to nature and to each other. I agree!
Perle Fine, Surfscape #3, 1958
Perle Fine, Summer I, 1985-1989