Tuesday, March 31, 2020

Project #9 - Texture Walk (Inside)

Hello Fratney students and friends! I think that you've probably noticed by now that the materials we're using are mostly things we can all find around the house. Some days I miss having all of the materials in our real Fratney Art Room, but I also like the challenge of making do with what's around.  Every day, I miss actually being with you in the real Art Room, making art together. For now, I hope that you are discovering some fun and creativity here!

Materials:  Paper (thin like copy paper works best), crayons with the paper peeled off, objects around your home with interesting textured surfaces. Optional - watercolor supplies.
Making:
1.  Take a walk around your house, collecting objects with interesting textured surfaces.
2.  Be prepared with crayons and paper at your work space.
3.  Take one object at a time and place it under your paper.
4.  Holding onto the object through the paper, rub the side of the crayon onto the paper to create an impression of the texture.
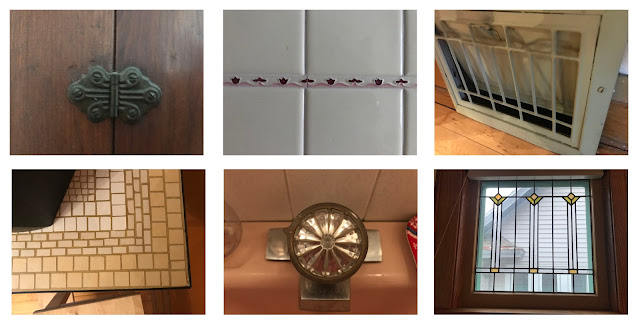
5.  You may also find textures that are not movable, like these:
Optional Step: If you have watercolor supplies at home, you can paint over the crayon. Because the crayons are oil-based, they resist the water-based paints.  This technique is known as watercolor-crayon resist.

L'origine de la pendule, 1925


Inspiration: Max Ernst was a surrealist artist who developed a technique he termed "frottage", based on the French verb, frotter (to rub).  He began much of his artwork by using charcoal pencils to make texture rubbings from different surfaces, including metal machine parts, wood, and other natural materials.  

Surrealism is a movement in art and literature that began in 1917 (more that 100 years ago!). Surrealist art is often described as dreamlike or otherworldly, depicting images that don't normally go together or appear in the "real world".

Here are three examples of Max Ernst's frottage art.
Petite Frottage IV, 1974
When Light Cartwheels, 1926


Monday, March 30, 2020

Project #8 - Paper Beads

Hi Fratney students and friends! It's been two weeks since we were at school together, and I am missing you!  It will be a joyful reunion when we are back at school!  Until then, I hope you are each feeling happy and healthy at home with your family. 

I was thinking about Project #6 - Personal Color Bracelets and what you can do if you don't have any beads at your house. You can make your own!

Materials - Colorful recycled paper (old magazines or calendars work well), scissors, a pencil, glue

Making -
1.  Cut paper into long strips. They can be rectangular, but a long triangle looks best.
2.  To make each bead, roll a strip of paper around your pencil with the colorful side outward facing. 
3.  Add glue in the final inch or so to hold the bead's shape. 
4.  Count for 10-20 seconds to let the glue dry.
5.  Once you have several beads made, you are ready to make bracelets, or even necklaces.

Optional step - You could put a shiny finish onto the beads using watered down glue or an acrylic varnish.


Inspiration - A group of women who live in Uganda work together in a collective business using recycled paper to make beautiful paper beads and jewelry.  You can see them working at https://www.youtube.com/watch?v=KNnEIKHQmh0

Sunday, March 29, 2020

Project #7 - DIY Sketchbook 1


Earlier in this blog, we talked about the importance of having a place in your home to make art. Today, we are constructing the first in a series of DIY sketchbooks. A sketchbook is a space to collect your art ideas using any 2-dimensional technique, especially drawing. You can combine writing and images, and experiment with different materials. If you don't have a store bought sketchbook, there are many different ways that you can make your own.

Materials - Paper (I used 11x17 printer paper), string, recycled cardboard, scissors, pen
Making - I tried my best to describe the steps, but it's definitely better to watch the video. 
1. Fold paper 2x in the wide direction and then 1x in the narrow direction.
2. Open the 2nd and 3rd fold, so that the paper is only folded 1x.
3. Cut from the 1st folded edge to the 2nd fold, on the 3rd fold.
4. Open the paper all the way and the "hot dog" fold (the 3rd fold).
5. Push the edges of the folded paper toward each other so that the cut space opens up into a diamond shape.
6.  Squash the diamond shape all the way down. This is your basic book.
7.  Repeat steps 1-6 with a second piece of paper.
8.  Use a string to tie the two sections of book together.
9.  Trace the shape of the book onto a folded piece of scrap cardboard.
10. Cut the cardboard cover.
11.  Tie the cover and inside of the book together.
12.  Have fun using your new sketchbook!

Inspiration - A sketchbook is a place for practicing artists to work. A related idea is an artist book, a book that is an actual work of art. Some books are both.  I recently saw the artist books of Evelyn Patricia Terry.  Evelyn is an artist we should all get to know.  She has been practicing her art in Milwaukee since the 1970's.  Evelyn recently had an exhibit at the Lynden Sculpture Garden, titled "America's Favor/Guests Who Came to Dinner (and Stayed!)". Her exhibit included artist books made from a variety of mixed media surfaces.  A centerpiece to the exhibit was the installation of a dining room table set around her collection of handmade dolls. On each of the plates set at the table, Evelyn had handwritten a reason that a person might migrate to America. Looking at Evelyn's work, one feels inspired by the beauty, but also by the important ideas that she investigates.  You can find out more about this exhibit at https://www.lyndensculpturegarden.org/exhibitions/evelyn-patricia-terry.


Saturday, March 28, 2020

Guest Artists - Georgia, Victoria, Audrey and Mal


Way to go, Georgia and Victoria,  for showing some personality and skill with your graffiti lettering! 


A few months ago, Audrey(left) got to paint on an actual wall, with her dad (he's an artist). Glad to see she is wearing a safety mask!


Also, big thanks to Mal's family and Georgia's family for reminding us of the magic of getting outside to wake up our senses and get creative. I, for one, will definitely be spending some time at the beach this weekend!

Friday, March 27, 2020

Project #6 - Personal Color Bracelets


COLOR & PERSONALITY
Red - loving, energetic, outgoing
Pink - affectionate, happy, gentle
Orange - funny, adventurous, impulsive
Yellow - social, enthusiastic, helpful
Green - caring, dependable, creative
Blue - peaceful, sensitive, loyal
Purple - generous, spiritual, charming
White -  honest, calm, listener  
Silver - graceful, insightful, sensible
Gold - wise, traditional, confident


Materials - beads in different colors, elastic cord (or yarn, string, ribbon), scissors

Making
1.  Look at the list of colors above and the personality traits they are matched with.  
2.  Choose two or more traits to match your own personality.
3.  Pick out the corresponding colors. The more strongly you connect with a trait, the more beads of that color you can select.
4.  String the beads onto a piece of cord that will fit comfortably around your wrist.
5.  Tie the ends of the cord into a knot.
6.  Wear with pride!

After you've made your bracelet, you can make one for each person in your family. It can feel good to think about the qualities we appreciate in others. It's also fun to give gifts!

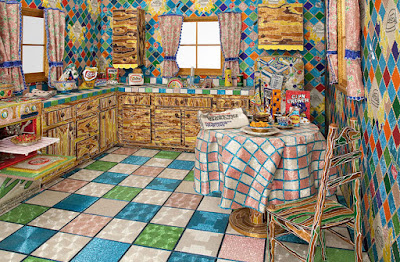
Inspiration - In making a bracelet, we are working with a small handful of large beads. Imagine spending five years carefully placing thousands of small glass beads! That's exactly what Liza Lou did in the "Kitchen", a life-sized installation in which every surface is composed of glass beads.  Liza Lou says this work is a memorial to labor, especially to what is traditionally seen as women's work. "Kitchen" is also a celebration of color.

There is much more to explore in the art of Liza Lou, and much more we could do with beads. Let's do both in a future post!


Thursday, March 26, 2020

ART LINKS

Send your favorite online art links to me (Ms. Sue) at pezanosm@milwaukee.k12.wi.us or place in the comments section below, and I will post them here to share with the rest of our La Escuela Fratney friends.
  • Lynden Sculpture Garden's Virtual Hub - A new online resource with virtual tours and resources for families and teachers. When you visit the site, you can subscribe to a list to receive notice as new content is added. https://lynden.tours

Wednesday, March 25, 2020

Project #5 - Graffiti Lettering Styles

Step-by-step design of the Spanish word "nosotros" (We or Us)
Practicing 6 different styles of the Spanish word "amigxs" (friend, gender neutral)
Materials - Paper, pencil, pen/marker

Making - The image on the left side above shows five steps you could use to design a word. Of course, you don't need to show every single step in this way. I just wanted you to see how each step leads to a finished design.  The image on the right side above shows one word done in six different styles.  I don't worry about being perfect, and you don't need to either. Graffiti lettering is very much about free style, trying different things to see what will happen. 
1.  Choose a word and write it lightly on your paper. The letters should be spaced apart to give you room to change each letter from line to shape. The word could be your name or any word that represents something meaningful to you.
2.  Any style you try is basically done by creating a boundary or space around each line. You  can choose a style that is round and bubbly or full of angles and sharp corners.
3.  After you've given your letters some shape, you can add sides or shadows. I always work those into the left and bottom edges.
4.  When you draw a line or lines around a word, that is sometimes called a "force field".
5.  Next, you can add shine lines or shapes and other embellishing details.

Inspiration - Graffiti or street artists create art in public spaces, which makes their work accessible to everyone who passes by. By putting their art in a public space graffiti artists are choosing to start a public conversation. Often, their messages are about a social justice issue.  Sometimes artists are hired to paint on walls, or they work on spaces that are abandoned or neglected. Graffiti is sometimes seen as vandalism when it is put on privately owned buildings without permission. More and more, the talents of street artists  are being taken seriously by the art world and by the general public.
Because there are so many talented graffiti artists, it was difficult to choose just one to share with you.  Shamsia Hassani is a graffiti artist who was born in Iran. She teaches at the Kabul University in Afghanistan. Her art has been exhibited in several countries all around the world.  Shamsia's personal motto is "Art is stronger than war".  She has painted on buildings that have been destroyed by war. Her art is filled with details from her own life and positive images of women in their traditional clothing.  

Guest Artists - Mal, Ms Elaine's family, Georgia & Everett

Malcolm (in Ms Annie's 1st grade class) and Ms Elaine's children shared their paper collages inspired by the Quilts of Gee's Bend:


Georgia (from Mr. Hernandez's class) made some plastic yarn (plarn). She is weaving the plastic yarn on a hat loom to make a reusable vegetable bag.


One more, Everett made this clever silly drawing of a screwdriver using a screwdriver, 😆

Tuesday, March 24, 2020

Fratney Garden Project Update

In early March, the 5th grade Art Club began leading a schoolwide garden project, in part for the Carton2Garden Program, https://carton2garden.com. Students began by sketching ideas, and a strong direction emerged. They wanted to build a greenhouse that would help us get a headstart on the growing season, a great idea when you live in Wisconsin! Most of their drawings also included plans to collect and store rainwater, create vertical gardens, and make birdhouses.
Several adults are helping with the project. Our school's social worker, Milissa, introduced the project to us, and helps with the work and gathering materials. Molly Hassler is a visiting artist brought to our school through the Lynden Sculpture Garden.  Molly helps us with the creative planning and artistic vision. Ron Hrlevich is a neighbor and carpenter who brings his building expertise. Mr. Gray, our building custodian helps us collect recycled materials for the project. He also gives us equipment for doing the work, like wheelbarrows and shovels. Also, Mike Marek, parent of Otto and Alika, will be supplying the compost and gravel for inside the greenhouse.

We will continue to post updates on this garden project, and are especially thinking about how students can help during these days of "social distancing'.  Here is a time lapse video that shows our first day of working on the front lawn of our school.


Students cutting pvc sections for the greenhouse roof.

Monday, March 23, 2020

Project #4 - Silly Drawing & Surrealism, Food Edition

Materials - Paper and pencil (or pen, marker, crayon, chalk)

Making
1.  Sit in a place where you feel calm and comfortable.
2.  Read through the prompts and start with the one that grabs your imagination the best.
3.  Draw large to give space for lots of details. 
4.  When you think your done, add 3 more details.
5.  Pick another prompt. Repeat steps 1-5. 

Silly Drawing, Food
Tulipops
1 Draw a piece of fruit in outer space.
2 Draw a Pop Tart lifting weights.
3 Draw a loaf of bread at a disco.
4 Draw a rainstorm of sprinkles.
5 Draw french fries on a rollercoaster.
6 Draw a food eating another food.
7 Draw a walking taco.
8 Draw chicken wings flying.
9 Draw a banana slipping on banana peels.
10 Draw a cookie with googly eyes instead of chocolate chips.
11 Draw a pineapple rollerblading.
12 Draw a piece of asparagus snowboarding.
13 Draw an annoying orange.
14 Draw a donut riding a skateboard.
15 Draw a turkey leg eating a turkey sandwich.
16 Draw a cheeseburger wearing a dress.
17 Draw a banana in pajamas.
18 Draw a peanut butter and jelly sandwich on vacation.
19 Draw an apple talking to your art teacher.
20 Draw a hot dog flying.
21 Draw a lemon making orange juice.
22 Draw an ice cream cone eating a Popsicle.
23 Draw a garden of lollipops.
(https://theartofeducation.edu)

Inspiration - Paul Fuentes is a contemporary designer, photographer and surrealist artist who lives in Mexico City. Like many surrealist artists now and throughout history, Paul Fuentes makes art that surprises us by combining two different things in a way that we would not see in real life. Check out more of his art at https://www.paulfuentesdesign.com/artworks
Cat Sushi


Taco Bag

Planet Soup

Sunday, March 22, 2020

Project #3 - Making Plastic Yarn (Plarn)

Somos protectores de la vida y el ambiente del planeta Tierra. 

We are caretakers for the life and environment of the planet Earth. 

The above statements are part of La Escuela Fratney's third theme each school year.  In the Fratney Art Room, we often make art using recycled materials, while talking about the importance of caring for all life and the environment. 

In this project, I am sharing something that we learned during a Fratney Community Night from parents Lane Burns, Jason Boose and their friend, Jess Poisl.  Plarn can be used in any way that you use regular yarn. In future posts, we can make art using our plastic yarn.

Materials - Plastic grocery bags, scissors

Making -  1. Smooth and flatten bag.  2.  Cut off the bottom seam and top handles.

3.  Cut bag from side to side in 1/2" - 1" strips.  4.  You now have several loops of plastic that you can connect together, as shown in the video below.  To store the plastic yarn and keep it from tangling, wrap it around a scrap of cardboard or a stick.


Inspiration - Lane Burns is an artist living in Milwaukee and the mom of Malcolm and August. She works with lots of different materials, including recycled plastics. This is just one example of her beautiful work: 

Saturday, March 21, 2020

Project #2 - Collecting Nature

Materials Needed - Time, adult supervision, a park/other natural setting, gloves and your 5 senses.

Making -
1.  Use 4 of your 5 senses (sight, smell, sound, touch, NOT taste) to pay attention to the nature around you.
2.  Look for small, abundant items that have interesting colors, textures and shapes. Do not damage any living plants.
3. Take just a few of your favorite things.
4.  When you get home, organize your new collection in different ways, based on qualities like size or color. 
5.  Ask yourself some questions about an item, for example a stick:  Why did I pick this up? What do I like about this stick? What story can I tell about all the things that happened to this stick before I found it?  How could I use this stick in a future art project?

When taking a walk these days, there are necessary rules to follow, like keeping a 6-foot distance from other people and not touching what may have been touched by others. Just the way it is for now.  I notice people in my neighborhood are now even friendlier than usual.  We wave our hands and smile to each other, shouting out things like "Glad the sun came out" or "Remember to wash your hands!".  It's great to be outside and move your body.  And, if you live near some nature, be on the look out for a few natural materials for making art. I went out for a walk with my favorite 4-year-old and we collected the things you see in the photo above. We wore gloves and were careful to take just a few things, so as not to disturb the ecosystems of the forest. 


Inspiration - Andy Goldsworthy is a British sculptor and photographer. He is best known for working with natural materials in a natural setting. He often works with flowers, leaves or other organic materials that will quickly decay. Because of this, he documents his work with photography. The artwork that Goldsworthy creates emphasizes the beauty found in nature, and the importance of showing care for the environment.